This blog is getting a new home! I am relocating Craft Rules for Happiness to my WordPress blog also known as The Resplendent Beauty which can be found here www.theresplendentbeauty.com! It is my hope that by consolidating my writing efforts, it will be easier for me to manage! I will also be moving my other blogger blog over but it may take longer as it has many more posts!
This blog will eventually be removed but not to worry... Everything is already safe at the other site and I hope you will follow along!
Monday, December 12, 2011
Saturday, December 10, 2011
Felt Ornament
All of the samples I have seen use red felt and red thread. I think this is a perfect ornament for experimenting with some different color combinations. I did not go too far off the original for my first attempt. :-)

I have some gold organza ribbon that I used for the hanging loop and then I found some metallic braid in my beading stash!

This braid is from Kreinik...

And my favorite thing about it...

Hooray for Kreinik! I think the bowl is another story. My youngest received it as a gift from a cast mate when she was in King and I locally. But it measures just under 4.5 inches and after I traced the bowl, my circle was just right.

And I will leave you with a close up of the knot details.

I think the metallic thread adds just the right touch of sparkle to this ornament!
Wednesday, December 7, 2011
A different sort of crafting... Part 2
Tour is today! Yea for Stars and Clowns!
Top Hats, Berets and Muffs are all done. And now bow ties and earrings are nearly complete. Nearly? Yes, nearly. Why, oh why is Hobby Lobby not an all night store during December? I need large safety pins (have plenty at the school) and more clip-on earring backs. I found one pair of clips in my personal stash and none in the school supply box. So I will be heading to Walmart as soon as it starts to get light. Got to have the clips! *update* Walmart does not have clips! I wound up taking apart some vintage earrings from my grandmother and using those clips. That worked great!
The safety pins need to be glued to the back of the bow ties so that the boys can pin them at their collars.
I've got more photos to share of all this too...
Bows waiting for their center bands....


Earrings are done for pierced ears but I still need to go buy clips for 5 pairs. More hot glue! I wanted to use E6000 or G-S Hypo Cement to attach the backs but neither one of my glues was working properly. Too old I think.... So hot glue is what I used.

Top Hats, Berets and Muffs are all done. And now bow ties and earrings are nearly complete. Nearly? Yes, nearly. Why, oh why is Hobby Lobby not an all night store during December? I need large safety pins (have plenty at the school) and more clip-on earring backs. I found one pair of clips in my personal stash and none in the school supply box. So I will be heading to Walmart as soon as it starts to get light. Got to have the clips! *update* Walmart does not have clips! I wound up taking apart some vintage earrings from my grandmother and using those clips. That worked great!
The safety pins need to be glued to the back of the bow ties so that the boys can pin them at their collars.
I've got more photos to share of all this too...
Bows waiting for their center bands....

Center bands waiting to go on to the bows.

Bows waiting for safety pins....

I did find two safety pins here and they are attached already.

Working on all these bow ties requires working with hot glue. My glue gun gets very hot. I have a blister from using it yesterday when I was adding the floral trim to the top hats. I hate that! So adding the red sequins at the end is an easy place to burn yourself but I found the perfect tool to help! My DH bought this for me at Mike's Merchandise several years ago. I think it is a wax carving tool.

This is a picture of the complete tool. I never really found a use for it before so I am thrilled to now know how I am going to use it!

Earrings are done for pierced ears but I still need to go buy clips for 5 pairs. More hot glue! I wanted to use E6000 or G-S Hypo Cement to attach the backs but neither one of my glues was working properly. Too old I think.... So hot glue is what I used.

Tuesday, December 6, 2011
A different sort of crafting
I am helping the Stars (middle school show choir) with their accessories before their Christmas tour tomorrow. This means making earrings, bowties and decorating top hats, berets and muffs. They look gorgeous when they are all put together.
I started on the earrings with this...


Then I spray painted them...

Thanks to my DH who helped me with the straws. This was a great use of the florist foam that was sitting under my sink. I never do fresh flower arrangements with it!
More finished products later....
Monday, November 28, 2011
Snowy Basket
I am going to put it out there for everyone to see. I love Pinterest! Yes, it can be an easy way to waste time, but I try to use it for finding inspiration. The sheer number of craft ideas and sewing projects is astounding! I am so thankful that crafters and sewers are such a generous group!
While looking through the DIY list yesterday, I found a great pin which took me to an excellent tutorial for making fabric baskets. The Sometimes Crafter made this look so easy, I had to try it!


I am so pleased with how this turned out! I think I will use it for Christmas cards this year and I suspect I will be making quite a few more too!
Oh yes, I should mention that we are expecting our first snow of the season tonight and tomorrow. It's still November and that is crazy early for North Alabama!
Wednesday, November 23, 2011
Playing with the Whimsy Sticks
I had the opportunity to make a Whimsy flower last Saturday while attending the Stitch, Craft and Create launch party. My girls and I were hooked! This is one of the flowers that my daughters made. Isn't it beautiful?

Then, I stopped at JoAnn Fabric today with the girls in tow and my youngest wanted to get more of the velvet ribbon. The only color she could find was this deep burgundy. It was wider than the the widest one we used on Saturday and we also got one even wider. We used the narrowest one (3/4") on the smaller Whimsy Stick to make this flower. For the center, I cut a length of the widest ribbom and tied two knots in it. Then she glued the ends together in the middle. We wrapped the Whimsy portion around the knots. (These are two sided flowers! They make great ornaments!) I will try to get another picture with better lighting so you can see the details.

Then we looked at what other ribbon we had on hand. This is a 1.5" grosgrain ribbon. She wrapped it around the larger Whimsy Stick and sewed it down on one side instead of in the middle. I then gathered it for her and she sewed it into a circle. The button is attached with FabriTac. We are not sure what we will do with this one but we have several ideas brewing.

So these Whimsy Sticks were kind of pricey but I think they are going to be getting a lot of use.
Monday, November 21, 2011
My First Art Quilt
I started and finished my first art quilt this weekend!!! It was a gift for a friend and I was able to give it to her today. I think she liked it! Yea! This allowed me to fulfill the first of my handmade commitments that I made on FB too!


I got some help with choosing fabrics from a sweet friend at church who is a wonderful quilter. I used tricks I learned from another friend for the batting (warm 'n' natural). I also learned how to bind it by following a tutorial at Stitch, Craft & Create's website. It is not perfectly square but I'm not sure that isn't because of the felt that I used in the center. The snowman is needle felted as is the star. I had so much fun making this for my friend!


I got some help with choosing fabrics from a sweet friend at church who is a wonderful quilter. I used tricks I learned from another friend for the batting (warm 'n' natural). I also learned how to bind it by following a tutorial at Stitch, Craft & Create's website. It is not perfectly square but I'm not sure that isn't because of the felt that I used in the center. The snowman is needle felted as is the star. I had so much fun making this for my friend!
Thursday, November 3, 2011
Wine Charm
This is the first in a series of wine charms that I am making for a friend who has a mini store within another store. I started with the wine bottle cuff. No... I actually started by making the rose ornament and then had to figure out how to turn it into a tag or charm. I went with the charm idea and created the wine bottle cuff. The charm can be removed, though it make take some careful maneuvering to make that happen.

The cuff part is easily removed from the bottle.


A more detailed look at the back of the cuff.

A larger shot of the details.

The cuff part is easily removed from the bottle.

The rose is made with raw edges.
A more detailed look at the back of the cuff.

A larger shot of the details.
Wednesday, November 2, 2011
Creativity
I think creativity is something most people have. I'm not saying that we all use our creativity because that would not be true. But creativity does not mean that you are going to paint a masterpiece or that you can design a formal gown for your next event. Creativity is all around us! It is in taking the leftovers in your fridge and making a new meal. It is swapping up the clothes in your closet to create a new outfit with different accessories. Creativity is rearranging the furniture in your living room, hanging pictures on the wall.
So why do we hesitate to be creative? There are some places where creativity is not really needed. I certainly do not want my accountant using creative math on my balance sheet, nor would I want the driver beside me to decide that she needed to choreograph her next stunt on the highway. But sometimes, creativity is just what we need to solve problems, to think outside our little boxes.
Do you have ways of fostering that sort of creative problem solving? What about ways to foster creativity in your arts and crafts endeavors? How do you learn to trust what your creativity is telling you? Are you afraid of failing? When it comes to arts, I don't believe that we truly have failures. I think of those things are learning experiences and teaching tools to share with others. Sometimes they are happy accidents that lead me down a path to new explorations. If I hadn't tried to do something new, I wouldn't be where I am now.
Sometimes, we just need to let that creative voice loose and let it try something new. It may not work, but it might be something even better.
Monday, October 24, 2011
The First Painted Shirt
So the title is not technically accurate! My oldest painted her design on a piece of cotton and we then appliqued it to the sweatshirt. She is very excited about the way it turned out and I am so proud of her! I'm going to have to see if I can get a better detail shot later.


Friday, October 21, 2011
Stitch Craft Create
I picked up the premier issue of the new magazine Stitch Craft Create. I have been following them on FB and twitter for a couple of months and waiting until I could pick this up. I was not disappointed at all! It is beautiful with craft ideas that are suitable for beginners and experts. I also love that they have projects and downloadables on their website. One of the projects is a fabric coffee cozy. I love to make felt coffee cozies so I had to try this one too! I modified mine to use 2 vintage buttons so that the cozy is truly reversible. I need to tweak my construction process a bit but otherwise, I am very pleased!


And then the other side...

Thank you Stitch Craft and Create! I'm looking forward to watching you grow!
Monday, September 5, 2011
One last day of crafting.
Only one thing to show today so far. My youngest DD will be a clown this year at AAA and we have been planning her costume for some time now. Shortly after school started, the teacher asked each student about what their plans were for their costume. DD said she wanted to be a button clown. The teacher then told her about a style of dress in the UK where the clothing is covered in buttons. I thought she meant something during the victorian period but after researching we found this.

These people are members of the Pearlies and the women are queens and the men are kings. You can read about the Pearlies on Wikipedia. The group has quite the history.
Back to the clown costume... We could not use a Pearly type costume for clowns as they are not colorful enough! The AAA clowns are known for bright shiny colors with black and white accents. But in an homage to the Pearlies, I made a headband for DD today.

I used wool blend felt (2" x 9") and sewed 35 white buttons onto it. Then I used a blanket stitch to attach the back to one side. Before sewing the other side together, I inserted a narrow black elastic headband. When DD tried it on, the ends seemed to be too wide as they stopped well above her ears. I had her remove it and I found that I could taper the ends by folding them over each other towards the middle.


And this one is a bit blurry but it does show how well it spans the head.

These people are members of the Pearlies and the women are queens and the men are kings. You can read about the Pearlies on Wikipedia. The group has quite the history.
Back to the clown costume... We could not use a Pearly type costume for clowns as they are not colorful enough! The AAA clowns are known for bright shiny colors with black and white accents. But in an homage to the Pearlies, I made a headband for DD today.

I used wool blend felt (2" x 9") and sewed 35 white buttons onto it. Then I used a blanket stitch to attach the back to one side. Before sewing the other side together, I inserted a narrow black elastic headband. When DD tried it on, the ends seemed to be too wide as they stopped well above her ears. I had her remove it and I found that I could taper the ends by folding them over each other towards the middle.

Next time, I would cut the tapers into the felt and use the blanket stitch so as not to have the extra fabric on the ends. But this way does still work!

You can get a glimpse of my photography setup in this photo!

And this one is a bit blurry but it does show how well it spans the head.
Rule #6
When photographing your craft, finished or not, light matters! Check out my headband post below and just see the differences in the colors and vibrancy of the ribbon!
Sunday, September 4, 2011
And another project designed and created tonight!
The same DD has been asking for ribbons for headbands lately. I knew I had a stash of beautiful ribbons that I found in Nashville a couple of years ago. (Textile Fabrics is fabulous for trims!!!) Then I saw a tutorial a day or so ago on making ribbons into headbands. The tutorial I saw did not do it quite this way but it was very similar. I also didn't pay attention to the part that said to keep your width to two inches or less. Oooops!


This ribbon is 2.5 inches wide (maybe a little less) but the colors are so vibrant! When DD saw this, it became the headband. So we chose a wool blend felt and lined the ribbon with that as the back of the ribbon was lots of threads from the weaving of the design. Is there a term for that type of ribbon?

I should also note that I am an impatient crafter and took photos before I actually finished the ends and trimmed the threads. What can I say? I couldn't wait to share it!

DD complained about modeling for me saying that her hair wasn't right but she is beautiful still. The light in the hallway where we took the photos does not do justice to the colors though. That's why I showed the detail photos first!


So thankful for a long weekend! Crafting!!!
Since school started there has not been much time to make new things. But finally, the long weekend has arrived and I made something tonight!

This is a zippered pouch for my oldest DD. I fell in love with this fabric but found that I didn't purchase enough to be able to match the design exactly on the front and back. Another crafting lesson!
The inside may be my favorite part this time. DD is a classical singer and we loved this fabric when we spotted it at Hancock Fabrics.

It has script names of most of the famous classical composers. I added two strips on one side to make credit card sized pockets for her too.
I think she loves it as much as I loved making it!
Sunday, August 7, 2011
What I Did On My Summer Vacation!
With the kids going back to school tomorrow, I thought it might be appropriate to review my summer crafting. I am surprised by how much actually got done. I do not have pictures of everything so I need to remedy that! This has certainly been one of my favorite tools this summer!
I made a skirt for my younder DD which is chronicled here. This helped me develop some ruffling skills which will be important going into the fall season. Next I made a pleated skirt for my older DD. I do not have a picture or blog post about this one but will try to rectify later. Again, pleating skills may be necessary for this fall.
I took a break from crocheting and made some fun jewelry for the girls which is blogged here. These were so fun to make! I made another one this past weekend for my youngest DD to give as a birthday present.
I discovered that my die cut machine (lever type) would actually cut fabric this summer. I put this information into practice to make this! I need to explore this idea further.
Then somewhere in the midst of the other things, I found my old quilting project and finished up an applique square. My bad quilt flashback was blogged here. You never know when that applique skill might come in handy.
Then I started back to sewing with phone covers. These things are so fun to make! I blogged about them here and here.
Then, because I needed the skill, I made a zipper case for my youngest DD. I need to photograph it for the blog still. I am going to make one (hopefully tonight) for my oldest DD. Putting in zippers has been a sticking point for me when sewing but no more! Not that 2 zippers makes me an expert in any way, shape or form!
When I look back at this list, I am amazed! I am so glad that I have blogged most of it to help me remember so much of what has been done! I don't think I have ever gotten so much done in a summer!
I will be armed with all kinds of new sewing skills for this fall! Why is that so important? I can answer that easily! My youngest DD should be a clown this year (if auditions go well!) and the costumes are so (and sew!) important. In years past, I have relied on friends to help. This year, one of them is moving to Phoenix for at least a year. The move is our loss and Phoenix's gain. There are others who will step up and help but I really want to try to do as much of it as I can myself.
So what's next? Well besides the zipper case, I have an apron in the works, more phone covers planned and some more quilting to do with a more modern color scheme. I cannot wait!
I made a skirt for my younder DD which is chronicled here. This helped me develop some ruffling skills which will be important going into the fall season. Next I made a pleated skirt for my older DD. I do not have a picture or blog post about this one but will try to rectify later. Again, pleating skills may be necessary for this fall.
I took a break from sewing and crocheted three hats for Uganda as part of a mission project at my church. These were fun to do and I hope to make another 3 or 4 later this fall. It turned into a family affair and my aunt joined in the project too.
I found a great tutorial for Tunisian crochet and taught myself how to do that! It turned out to be simple and fun. It just required a special crochet hook. It was quick to do too. I blogged it here.
I discovered that my die cut machine (lever type) would actually cut fabric this summer. I put this information into practice to make this! I need to explore this idea further.
Then somewhere in the midst of the other things, I found my old quilting project and finished up an applique square. My bad quilt flashback was blogged here. You never know when that applique skill might come in handy.
Then I started back to sewing with phone covers. These things are so fun to make! I blogged about them here and here.
Then, because I needed the skill, I made a zipper case for my youngest DD. I need to photograph it for the blog still. I am going to make one (hopefully tonight) for my oldest DD. Putting in zippers has been a sticking point for me when sewing but no more! Not that 2 zippers makes me an expert in any way, shape or form!
When I look back at this list, I am amazed! I am so glad that I have blogged most of it to help me remember so much of what has been done! I don't think I have ever gotten so much done in a summer!
I will be armed with all kinds of new sewing skills for this fall! Why is that so important? I can answer that easily! My youngest DD should be a clown this year (if auditions go well!) and the costumes are so (and sew!) important. In years past, I have relied on friends to help. This year, one of them is moving to Phoenix for at least a year. The move is our loss and Phoenix's gain. There are others who will step up and help but I really want to try to do as much of it as I can myself.
So what's next? Well besides the zipper case, I have an apron in the works, more phone covers planned and some more quilting to do with a more modern color scheme. I cannot wait!
Friday, August 5, 2011
Artfire Studio
I have added a link to my Artfire Studio now and two of the three phone covers in the picture below are available there! I have had the Artfire Studio for several years now but only one item has been listed there for quite some time.
Artfire, in case you are unfamiliar with it, is similar to Etsy except that the Studio owner pays a monthly fee instead of listing fees and commissions. Many Studio owners are represented on both sites. I hope you will take a few minutes to look around Artfire.
Artfire, in case you are unfamiliar with it, is similar to Etsy except that the Studio owner pays a monthly fee instead of listing fees and commissions. Many Studio owners are represented on both sites. I hope you will take a few minutes to look around Artfire.
Wednesday, August 3, 2011
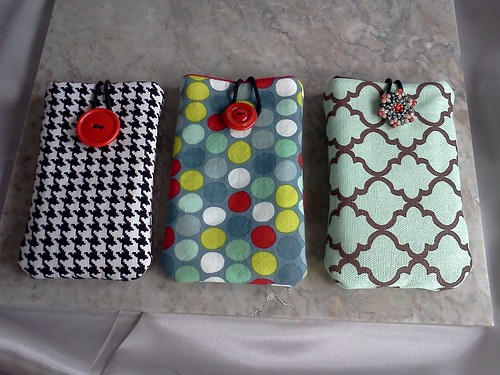
Three new phone covers
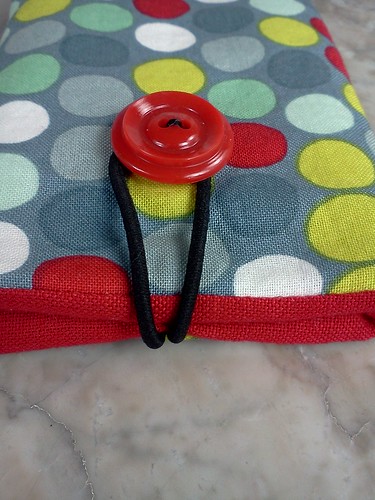
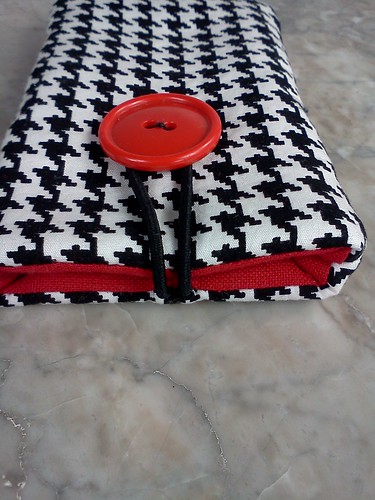
These are the three newest phone covers. All three are sized to fit iPhones though the houndstooth would probably fit best without a case on the phone.
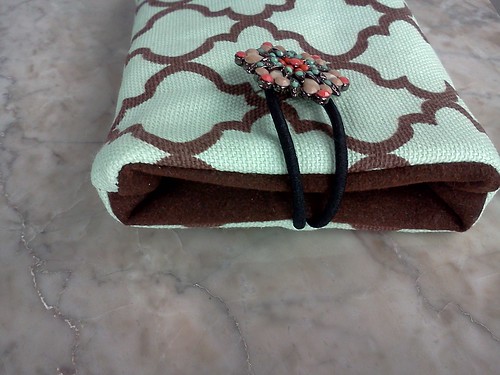
I love the jeweled button on this one and the ultrasuede interior!
Inside, a photo by theresplendentbeauty on Flickr.
This cute fabric just called out for red and the button is vintage from my Grandmother's button jar!
Inside, a photo by theresplendentbeauty on Flickr.
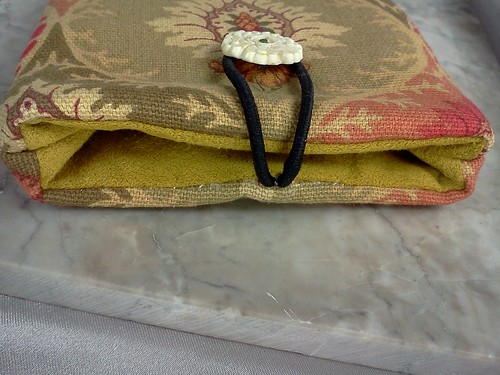
Another vintage button from my Grandmother's button jar.
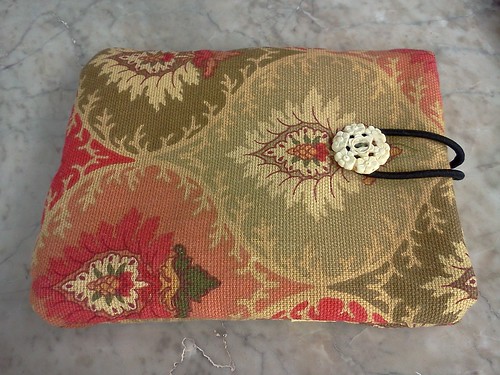
Front, a photo by theresplendentbeauty on Flickr.
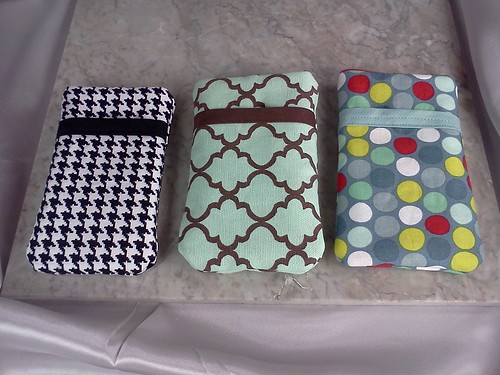
This is the same cover from a few days ago, photographed in a better setting!
I love the jeweled button on this one and the ultrasuede interior!
Inside, a photo by theresplendentbeauty on Flickr.
This cute fabric just called out for red and the button is vintage from my Grandmother's button jar!
Inside, a photo by theresplendentbeauty on Flickr.
Another vintage button from my Grandmother's button jar.
Front, a photo by theresplendentbeauty on Flickr.
This is the same cover from a few days ago, photographed in a better setting!
I love the softness of the ultrasuede interiors!
Subscribe to:
Posts (Atom)